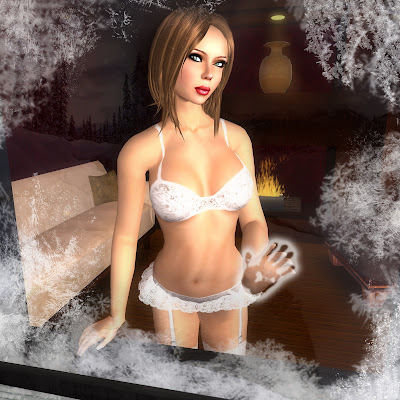
Here are the steps I took to create this photo:
Step 1: Shopping! First I had to pick out my lingerie to wear, as this was one of the requirements of the shot. I decided I needed something white- thinking icy, snowy, etc. I picked the Alice White set, because I loved the little lacy prim skirt and it just looked delicate (like a snowflake).
Step 2: Brainstorming. The idea that popped into my head when I read the theme was me looking out of a window, with frost on the window. I also love how when it's cold outside and warm inside, if you put your palm to the window it puts a hand print on the glass with a "vapor" around the hand print. So this was the idea I was going with, I wasn't sure of the angle of the shot, but I had the basic idea.
Step 3: Pose. I did my pose next because I needed something with me leaning into the window pressing my palm against it. I did some searching in SL, and while I found something close, it wasn't perfect. And me being a perfectionist, I decided to create my own pose. I used DazStudio to build my pose and import it into Second Life.
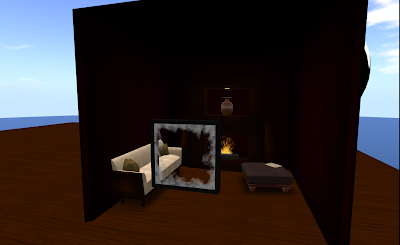
Step 4: Scene creation. One thing I definitely wanted was a fireplace somewhere in the shot. So I found one in my inventory and began building the room. I wanted a cozy homey look to reflect the theme. So I added a couch and an ottoman. I needed some wallpaper, so I created a floral pattern with some shadowing in the corners and uploaded it to SL. I chose a deep red to enhance the cozy warmth of 'inside' and chose a warm wood flooring texture and tinted it to suit the scene.
Step 5: Scene cont. Window texture. Next I started to work on a frosty window texture. I downloaded some free frost brushes from deviantart.com by the artist obsidiandawn. Also while I was there at deviantart, I found some great Stock photos of winter scenes by artist Resurgere, so I grabbed several of those, knowing I would need them later to build the 'outside' scene. I used the frost brushes to build a frame with a transparent center to use for my window, and uploaded it into Second Life, put the texture on a prim and used it for my window.

Step 6: Camera Angles. After the scene was built I played around with my camera angle. I wasn't sure if I was going to do the camera behind me with me looking out the window with the room reflected in the glass, or with the camera angle in front of me looking through the glass with the outside scene reflected in the glass. In the end, I decided that the camera in front showed off the lingerie the best and plus showed off my pretty face. :) I got a good angle and set my camera and went to adjust lighting.
Step 7: Lighting & Snapshots. I added a light near the ottoman to give the room and my avie a nice glow. I also wore my CG face light hud and played around with the controls until I was happy. Then I went into the environment editor and played with the settings until it looked like I wanted it to. Then snapped a few shots, adjusted the environment settings again and snapped some more. I usually do this several times to get as many frames/shots to pick from later on.
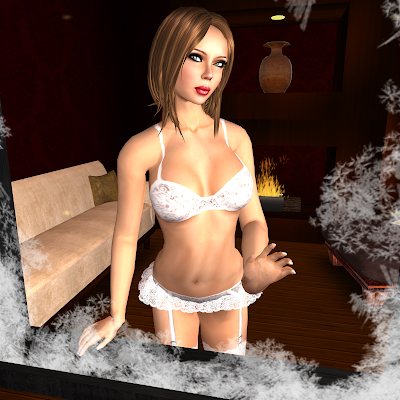
Post production- The key here is restraint, I try to keep things 'true to SL' while at the same time enhancing the photo. I think, and this is just my opinion, that some SL photos on sites like Flickr are overly done post production and don't even look like an SL snapshot, with hair painted on etc. I try to keep a good balance and not go too far overboard. I know for some that even my post production is over the top, it's all a matter of taste of course. The program I am using is Photoshop CS3, and here is the raw SL snapshot I started with:

Step 8: Smooth soft avie. First I selected only my body, and used a blur filter called Smooth Surface on a very low setting, which will blur things but keep edges. I also used the lasso tool with a feathered edge to select certain areas of my body and used guassian blur to give myself a nice soft look. I also used the stamp/clone tool to smooth any squared edges of my avie like my shoulders and waist.
Step 9: Frost. I loved the way the frost looked in the raw snapshot, but I felt it was a little blurry and needed some enhancement, so I took my frost brushes and added some sharper frost to the window. I also added some house siding with snow on it for the lower left corner of the photo.
Step 10: Glow. I used this technique to add a slight glow to the room, the opacity on the glow layer is very low so it is a subtle effect. I also masked the effect over my face so it didn't distort it. I also created a spot light glow for the light on the vase.
Step 11: Glass reflection. Using the Resugere Winter Scene Stock photos, I tried out a few before I found one that fit the file format and looked good reflected. The reflection is an easy technique, all it is is the photo on a layer above the image and opacity set very low. I also used a layer mask to control where the reflection was strongest, where it was absent, and where it was slight. I made the highest reflection show on the upper left of the photo, completely masked it for my face and top part of my body, and made it slight for the right side of the photo.
Step 12: Hand Vapor. I found an adult hand print photo and pasted it in, outlined it and deleted the white background. Then I added a layer effect, outside glow. I then rendered the layer, flattening it with it's effects. I then selected the hand print which was black and deleted it. What was left was the glow, then blurred the layer with guassian blur.
NOTE: Steps 10, 11, and 12 could have been done with step 5, by adding them all to the frosted window texture and uploading it to SL. I opted to do it post production because I have more control with masking.
And there you have it, that's how I made Window Frost. I plan on going into more depth on each of the steps at a later date for those that are just learning photoshop and need more explanation.
Here are the winners of the contest, 6th place isn't bad, and I got another gift card, yay! Congratulations to all the winners!

No comments:
Post a Comment